Code Shaders
Overview
Chroma provides a set of macros that you can use in your code shaders. These macros are used to sample gradients, curves and other Chroma-specific properties.
Note: Gradients and curves are only a part of Chroma. For the full list of attributes, see Shader UI Attributes.
Adding a Gradient to a Shader
To create a gradient, you need to add a [Gradient] attribute to your shader:
Properties
{
    [Gradient(512, HDR)] _MyGradient("My Gradient", 2D) = "white" {}
}
The property type of gradient is always a texture (Texture2D in Shader Graph and 2D in code). The texture is a 1D strip that contains the gradient data. It is created automatically when you add a gradient property to your shader.
Gradient properties take two optional parameters:
Resolution- The resolution of the gradient texture. The higher the resolution, the smoother the gradient. The default value is 256. If you’re noticing banding (staircase effect) in your gradient, try increasing the resolution to 512 or 1024.HDR- Whether the gradient is HDR or not. The default value isfalse. HDR means that the gradient can have values greater than 1.0. This is useful if you want to use the gradient to control the intensity of a light, or make parts of an object emissive.
Usage
To use Chroma’s macros, you need to include the Chroma.hlsl file in your shader. This file is located in the Chroma package in the Chroma/Core/HLSL folder. It is automatically imported when you install Chroma.
To include the file, add the following line to the top of your shader, depending on your Render Pipeline:
- Built-in RP
#include "Packages/com.alelievr.chroma/Core/Chroma.cginc"
- URP
#include "Packages/com.unity.render-pipelines.universal/ShaderLibrary/Core.hlsl"
#include "Chroma/Core/Chroma.hlsl"
- HDRP
#include "Packages/com.unity.render-pipelines.high-definition/Runtime/ShaderLibrary/ShaderVariables.hlsl"
#include "Chroma/Core/Chroma.hlsl"
Macros
Gradients
These are the macros for declaring and sampling gradients.
GRADIENT
The GRADIENT macro is used to declare a gradient in a shader. Under the hood this macro introduces a texture and a sampler. Here is an example:
GRADIENT(_MyGradient);
SAMPLE_GRADIENT
The SAMPLE_GRADIENT macro allows you to sample a gradient. It has the following signature:
float4 SAMPLE_GRADIENT(
    float4 gradientProperty,
    float t
)
gradientProperty is the Chroma gradient property you want to sample. It can be a normal gradient, a rainbow gradient or a random gradient. t is the time parameter. It can be a value between 0 and 1 or a value between 0 and gradientProperty.w.
SAMPLE_GRADIENT_X
The SAMPLE_GRADIENT_X macro allows you to sample a gradient, specifiying a sampler2D to use. This is useful when you would like to re-use samplers in your shader. The macro has the following signature:
float4 SAMPLE_GRADIENT_X(
    float4 gradientProperty,
    sampler2D gradientSampler,
    float t
)
SAMPLE_GRADIENT_HDR
The SAMPLE_GRADIENT_HDR macro allows you to sample an HDR gradient (TODO: link). It has the same signature as SAMPLE_GRADIENT:
float4 SAMPLE_GRADIENT_HDR(
    float4 gradientProperty,
    float t
)
SAMPLE_GRADIENT_HDR_X
The SAMPLE_GRADIENT_HDR_X macro allows you to sample an HDR gradient, specifiying a sampler2D to use. It has the same signature as SAMPLE_GRADIENT_X:
float4 SAMPLE_GRADIENT_HDR_X(
    float4 gradientProperty,
    sampler2D gradientSampler,
    float t
)
Curves
These are the macros for declaring and sampling curves.
CURVE
The CURVE macro is used to declare a curve in a shader. Under the hood this macro introduces a texture and a sampler. Here is an example:
Properties
{
    [Curve] _MyCurve("My Curve", 2D) = "white" {}
}

CURVE(_MyCurve)
SAMPLE_CURVE
The CHROMA_SAMPLE_CURVE macro allows you to sample a curve. It has the following signature:
float CHROMA_SAMPLE_CURVE(
    float4 curveProperty,
    float t
)
curveProperty is the Chroma curve property you want to sample. t is the time parameter. It can be a value between 0 and 1 or a value between 0 and curveProperty.w.
SAMPLE_CURVE_X
The CHROMA_SAMPLE_CURVE_X macro allows you to sample a curve, specifiying a sampler2D to use. It has the following signature:
float CHROMA_SAMPLE_CURVE_X(
    float4 curveProperty,
    sampler2D curveSampler,
    float t
)
Example
The following example shows how to use the gradients and curves in code. In this simple example a gradient is used to color the object and a curve is used to control the specular highlight.
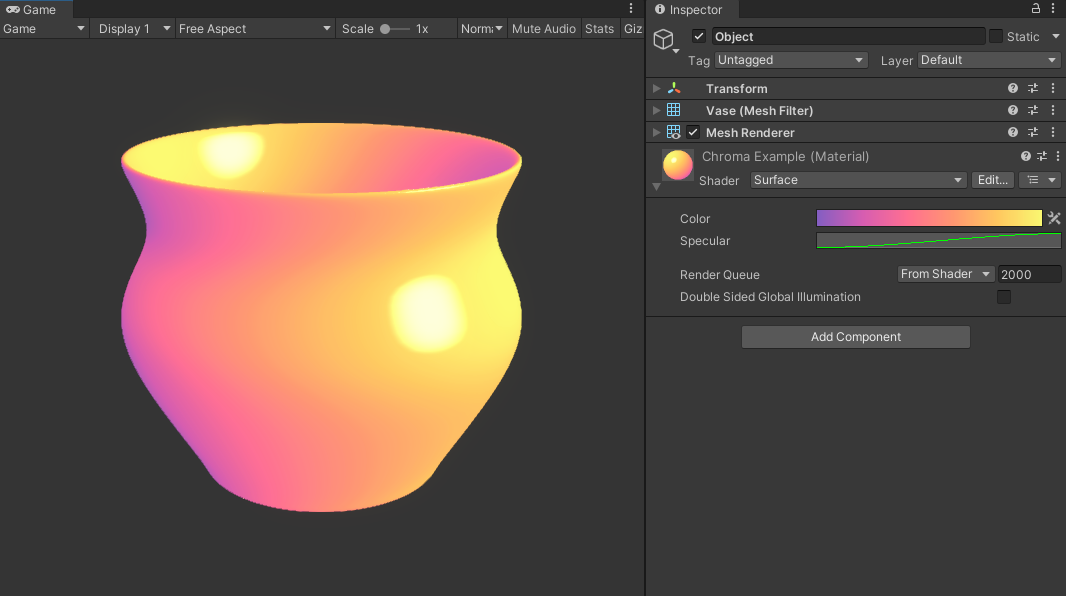
Final result of the example shader. The gradient is used to color the object and the curve is used to control the specular highlight (bright yellow spots).
Here, the gradient is a very convenient way to control the color of the object. Simply by changing the gradient you can achieve a vast variety of different styles. For example, changing the gradient mode to “Fixed” you can achieve a nice cel shading look.
The bright yellow spot on the vase is the specular highlight. With one curve we’ve added lots of control over over it: we can control the intensity of the highlight, its size and position of the highlight. Without the curve, we would have to expose all these parameters separately, and would have to hard-code rigid math into the shader itself. This is why curves are a very powerful tool in shaders.
Here is the shader code for this example:
Shader "Surface"
{
    Properties
    {
        [Gradient] _BaseGradient("Color", 2D) = "white" {}
        [Curve] _SpecularCurve("Specular", 2D) = "white" {}
    }

    SubShader
    {
        Tags { "RenderType"="Opaque" }

        Pass
        {
            HLSLPROGRAM
            #pragma vertex vert
            #pragma fragment frag

            #include "Assets/Chroma/Core/HLSL/Chroma.hlsl"
            #include "Packages/com.unity.render-pipelines.universal/ShaderLibrary/Lighting.hlsl"

            struct Attributes
            {
                float4 positionOS : POSITION;
                half3 normalOS : NORMAL;
            };

            struct Varyings
            {
                float4 positionHCS : SV_POSITION;
                float3 positionWS : TEXCOORD0;
                half3 normalWS : TEXCOORD1;
            };

            GRADIENT(_BaseGradient);
            CURVE(_SpecularCurve);

            Varyings vert(Attributes IN) {
                Varyings OUT;
                OUT.positionHCS = TransformObjectToHClip(IN.positionOS.xyz);
                OUT.positionWS = TransformObjectToWorld(IN.positionOS);
                OUT.normalWS = TransformObjectToWorldNormal(IN.normalOS);
                return OUT;
            }

            half4 frag(Varyings IN) : SV_Target {
                const half3 lightDirection = GetMainLight().direction;
                const half nDotL = dot(IN.normalWS, lightDirection) * 0.5 + 0.5;
                const half4 color = SAMPLE_GRADIENT(_BaseGradient, nDotL);

                const half3 viewDirection = GetWorldSpaceNormalizeViewDir(IN.positionWS);
                const half3 reflection = reflect(-lightDirection, IN.normalWS);
                const half rDotV = dot(reflection, viewDirection);
                const half specular = SAMPLE_CURVE(_SpecularCurve, rDotV);
                const half4 specularColor = half4(GetMainLight().color * specular, 1);

                return color + specularColor;
            }
            ENDHLSL
        }
    }
    CustomEditor "Chroma"
}
As you can see, the shader is very simple. Here’s a small breakdown:
- First, it uses the
[Gradient]and[Curve]attributes to add shader parameters. - Then it uses
GRADIENTandCURVEmacros to declare the gradient and curve properties. - Finally, it uses the
SAMPLE_GRADIENTandSAMPLE_CURVEmacros to sample the gradient and curve properties.
Note: The time value of the gradient is the dot product of the world space normal and the world space light direction. This means that the gradient is applied to the object based on the angle of the light and the normal of the object. This is a very common technique used to create a very flexible look.
That’s it! You can now use gradients and curves in your shaders.